
この記事では、コード品質を高めるためのツールを導入したNext.jsプロジェクトのセットアップ方法を紹介します。
コードの自動整形や品質チェック、また自動化されたテストによる CI 環境などを設定することでコード品質を維持しながら、開発プロセスを効率化することができます。
各ツール導入のメリット
今回導入するツールと、それぞれのメリットを最初にご紹介します。
- TypeScript:型安全を提供することで、開発中のエラーを減らし、開発効率を高めます。
- TailwindCSS:クラス名を使ってスタイルを定義することで、開発効率を高めます。
- Prettier:コードの一貫性を保つことができ、コードのフォーマットを自動的に整えることができます。
- ESLint:コードの品質をチェックすることができ、コードの品質を維持することができます。
- Husky:git commit時にコードを自動的にチェックし、コミット前にエラーを修正することができます。
- GitHub Actions:コードの品質をチェックする自動化されたテストとデプロイを設定することができ、開発者のミスを防ぎ、品質を高めることができます。
なお、今回は省いていますが Jest などのテストツールを導入することを検討してもいいでしょう。
手順
それではセットアップしていきましょう。
なお、今回の手順を終えたコードは以下のリポジトリで公開していますので、必要に応じご参照ください。
https://github.com/tmasuyama1114/nextjs-pj-template
1. Next.jsプロジェクト作成
最初に、ターミナルで以下のコマンドを実行します。
$ npx create-next-app my-app --typescriptこのコマンドにより、TypeScriptの設定が含まれたNext.jsプロジェクトが作成されます。
対話式で聞かれる各種設定はデフォルトにしています。
2. TailwindCSSを使う
次に、以下のコマンドを実行して、TailwindCSSをインストールします。
$ npm install tailwindcss次に、tailwind.config.jsというファイルを作成し、以下のように設定します。
/** @type {import('tailwindcss').Config} */
module.exports = {
  purge: ['./pages/**/*.{js,ts,jsx,tsx}', './components/**/*.{js,ts,jsx,tsx}'],
  darkMode: false,
  theme: {
    extend: {},
  },
  variants: {
    extend: {},
  },
  plugins: [],
};
これでTailwindCSSのセットアップは完了です
3. prettierを導入
Prettierは、コードのフォーマットを自動的に整えることができます。以下のコマンドを実行して、Prettierをインストールします。
$ npm install --save-dev prettier次に、ルートディレクトリに.prettierrcというファイルを作成し、以下のように設定します。
{
  "printWidth": 100,
  "singleQuote": true,
  "tabWidth": 2,
  "useTabs": false,
  "semi": true,
  "quoteProps": "as-needed",
  "trailingComma": "es5",
  "bracketSpacing": true,
  "bracketSameLine": false,
  "arrowParens": "always",
  "requirePragma": false,
  "insertPragma": false,
  "proseWrap": "preserve",
  "htmlWhitespaceSensitivity": "css",
  "vueIndentScriptAndStyle": false,
  "endOfLine": "lf",
  "embeddedLanguageFormatting": "auto",
  "singleAttributePerLine": true
}
ただし、一部 node_modules 配下のや yarn.lock などはPrettierで自動整形する必要はありません。
自動整形時の速度を上げるためにも、一部のディレクトリやファイルは自動整形の対象から除外しておきます。
ルートディレクトリに .prettierignoreというファイルを作成し、以下のように設定します。
node_modules
.next
yarn.lock
public
これでPrettierのセットアップは完了です。
4. ESLintを導入
ESLintは、コードの品質をチェックすることができます。
プロジェクト作成時にはデフォルト設定を選択して ESLint をインストールしていますが、TypeScript用のプラグインもインストールします。
次のコマンドを実行してください。
$ npm install @typescript-eslint/eslint-plugin@latest --save-devまた、import 文のソート順をチェックするためのプラグインも導入します。
$ npm install eslint-plugin-simple-import-sort@latest --save-dev次にルートディレクトリに.eslintrc.jsonというファイルを作成し、以下のように設定します。
{
  "extends": ["next", "next/core-web-vitals"],
  "plugins": ["@typescript-eslint", "simple-import-sort", "import"],
  "rules": {
    "simple-import-sort/imports": "error",
    "simple-import-sort/exports": "error",
    "import/first": "error",
    "import/newline-after-import": "error",
    "import/no-duplicates": "error",
    "@typescript-eslint/consistent-type-imports": "error"
  }
}
また、ESLint のコーディング規約を適用しないファイル・フォルダを設定しておきましょう。
.eslintignore を作成して下記を記述してください。
.next
next-env.d.ts
node_modules
yarn.lock
package-lock.json
public
これでESLintのセットアップは完了です。
5. huskyを導入する
Huskyは、git commit時にコードを自動的にチェックし、コミット前にエラーを修正することができます。
以下のコマンドを実行して、Huskyをセットアップします。
$ npx husky-initこれによりコミット時に .husky/pre-commit というファイルが実行されるようになります。
今回は、コミットする際に ESLint と Prettier による解析を実行させるので、.husky/pre-commit ファイルを開き以下のように設定してください。
#!/bin/sh
. "$(dirname "$0")/_/husky.sh"

# bash echo color
RED='\\033[1;31m'
GREEN='\\033[1;32m'
BLUE='\\033[1;36m'
BOLD='\\033[1;37m'
NC='\\033[0m'

echo "\\n 🚧🏗️  ${BOLD}Checking format, lint and types in your project before committing${NC}"

# Check Prettier standards
npm run check-format ||
(
    echo "\\n ❌🟨 Prettier Check ${RED}Failed${NC}. 🟨❌\\n Run ${BLUE}npm run format${NC}, add changes and try commit again.\\n";
    false;
)

# Check ESLint Standards
npm run check-lint ||
(
    echo "\\n ❌🟪 ESLint Check ${RED}Failed${NC}. 🟪❌\\n Make the required changes listed above, add changes and try to commit again.\\n"
    false;
)

# Check tsconfig standards
npm run check-types ||
(
    echo "\\n ❌🟦 Type check ${RED}Failed${NC}. 🟦❌\\n Make the changes required above.\\n"
    false;
)

# If everything passes... Now we can build
echo "🚀 ${BOLD}All passed... Trying to build before commiting.${NC} 🚀"

npm run build ||
(
    echo "\\n ❌🟩 Next build ${RED}Failed${NC}. 🟩❌\\n View the errors above to see why.\\n"
    false;
)

# If everything passes... Now we can commit
echo "✅✅ ${GREEN}Build is completed... I am committing this now.${NC} ✅✅\\n"
これでHuskyのセットアップは完了です。
これら、コード品質をチェックするためのコマンド (script) を用意に実行できるよう package.json の scripts 欄に以下のように追記しましょう。
...
"scripts": {
    ...,
    "check-types": "tsc --pretty --noEmit",
    "check-format": "prettier --check .",
    "check-lint": "eslint . --ext ts --ext tsx --ext js",
    "format": "prettier --write .",
    "check-all": "npm run check-format && npm run check-lint && npm run check-types",
    "fix-all": "npm run format && npm run lint -- --fix && npm run check-types"
  },
  ...
これにより npm run check-all というコマンドでコード品質のチェック、
そして npm run fix-all というコマンドでチェックした内容に基づいて自動修正できるようになりました。
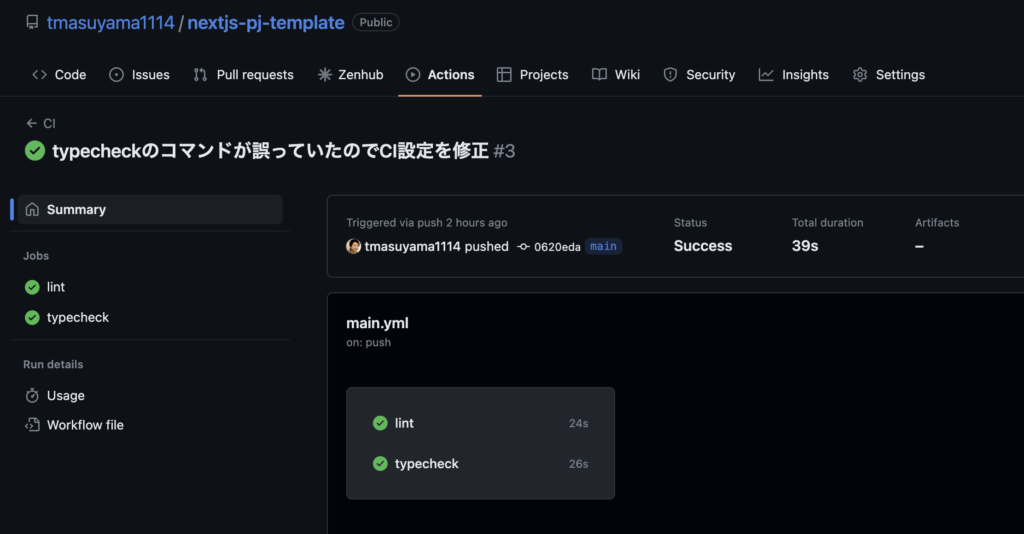
6. コード品質をチェックする仕組みをGitHub Actionsに組み込む
最後に CI ツールの一つである GitHub Actions を設定しましょう。
GitHub Actionsを使用すると、GitHubのリモートリポジトリにプッシュした際に自動的にコード品質をチェックすることができます。
では、プロジェクトのルートディレクトリに.github/workflowsとというディレクトリを作成します。
さらに.github/workflows/main.ymlというパスで main.yml ファイルを作成し、以下の設定を追加します。
name: CI

on:
  push:
    branches:
      - main

  pull_request:
    branches:
      - main

jobs:
  lint:
    runs-on: ubuntu-latest
    steps:
      - uses: actions/checkout@v3
      - uses: actions/setup-node@v3
        with:
          node-version-file: '.node-version'
          cache: 'npm'
      - run: npm install
      - run: npm run check-lint

  typecheck:
    runs-on: ubuntu-latest
    steps:
      - uses: actions/checkout@v3
      - uses: actions/setup-node@v3
        with:
          node-version-file: '.node-version'
          cache: 'npm'
      - run: npm install
      - run: npm run check-types
また、プロジェクト内に .node-version というファイルを作成し、node -v コマンドを実行して確認したバージョンを追記します。
例えば、以下のように設定します。 冒頭の「v」は抜いて記入することにご注意ください。
18.12.1実際にコミットし、プッシュしてみると以下のように Actions タブでチェック結果を確認できます。
Next.js のスキルを上げるには?
Next.js を使いこなすには JavaScript(TypeScript)と React の基礎知識が前提となります。
しかし、体系的に知識を身に付けるにあたり、何を準備したらいいのかは分かりにくいですよね。
そんな方は、以下の学習ロードマップを参考にしてみてください。
一通り学習したことがあるつもりでも、不足している分野、つまりスキルアップに繋がる技術が見つかるかもしれません。